I haven't written Perl code in over a decade. But as they say, you never forget your first love.
In short: I've crafted a Dancer2 plugin. With it, you can whip up a personal site or blog using just three lines of code.
Enter Dancer2::Plugin::LiteBlog, or just Liteblog for those in the know. Here's the backstory on how it came to be (and how to start using it).
Old Flames Burn Brightest
What prompted this? I wanted to give my quirky little personal site a facelift. But the idea of spinning up another Wordpress Docker image on my server felt overkill. The MySQL database, the tons of lines of PHP, the hassle of tweaking themes, hacking the JavaScript, the widgets, the WP plugins...
I didn't do anything. It felt daunting. I didn't like that. Maybe subconsciously, I was just itching to dive back into some Perl coding...
Then I stumbled upon a post by Jason announcing Dancer2
1.0.0.
A wave of nostalgia hit me. Memories of the early days flooded back - attending
FOSDEM in 2011,
the conferences, especially the one in Vienna in 2015 just for Dancer.
I remembered the great coding times, both online and in-person, with SawyerX and the Dancer Core Team. It hit me: I wanted to dive back into Dancer and reconnect with the Perl hacker inside me.
So, here I was: returning to my neglected GitHub account. I set up a new repository for my website, cloned it onto my laptop, and then executed the command that kicked everything off:
$ dancer2 gen -a myhomepage
...
For those unfamiliar with Dancer, this command sets up a new Dancer2 application in your current directory. It's ready to go and operates with the standard settings.
I then started the local web server:
$ cd myhomepage/
$ plackup ./bin/app.psgi
HTTP::Server::PSGI: Accepting connections at http://0:3000/
I could start hacking again.
A first experiment…
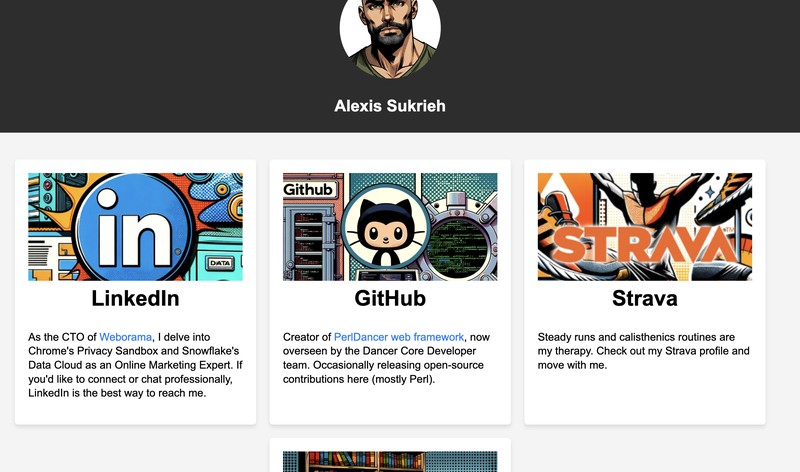
I began with a straightforward idea: the site would display a sleek, responsive grid of cards. Each card would represent a social network profile or an activity I'm involved in.
For instance, my LinkedIn, GitHub, and Strava profiles would all have their own cards. Each card would include a cover image, a title, and a brief description.
I wanted to keep things simple: no databases, just YAML for configurations and Markdown for content.
After some trial and error (shoutout to ChatGPT for offering spot-on CSS/HTML snippets when given a clear description of the desired result), I had something that closely matched my vision.
As I delved deeper into my coding session, aiming to create a simple blogging engine using Markdown files, I realized I had to refactor my code.
I wasn't comfortable with the idea that I was embedding so many generic elements directly into my personal homepage project. There was clear potential for reusability.
The more I was thinking about it, the more obvious it was: it had be a Dancer2 plugin.
Liteblog, the Dancer2 plugin
After about a week of coding (and man, was it fun to get back into Perl?), I rolled out the initial version of Dancer2::Plugin::LiteBlog (version 0.01).
Using it is super simple. It instantly turns your Dancer2 app into a minimalist blogging platform.
Here's how you can set up a website using it.
Setup process: installing Dancer2 and Liteblog
First off, ensure you have the right Perl environment set up. It's best not to rely on the system's default Perl.
Run the command below and follow the on-screen prompts after the build completes.
$ \curl -L https://install.perlbrew.pl | bashOnce you've got it ready, you can install cpanm and then, Dancer2 and
Dancer2::Plugin::LiteBlog:
$ prelbrew install-cpanm
...
$ cpanm -n Dancer2 Dancer2::Plugin::LiteBlog
Scaffolding and configuration
Great, your Dancer2 environement is there, you can now generate a new app and transform it to a Liteblog site
$ dancer2 gen -a myliteblog
+ myliteblog
+ myliteblog/cpanfile
+ myliteblog/MANIFEST.SKIP
+ myliteblog/config.yml
+ myliteblog/Makefile.PL
+ myliteblog/.dancer
+ myliteblog/bin
+ myliteblog/bin/app.psgi
...
Then, scaffold Liteblog inside the app directory:
$ cd myliteblog/
$ liteblog-scaffold .
Created: public/css/liteblog/activities.css
Created: views/layouts/liteblog.tt
Created: public/images/liteblog.jpg
Created: views/liteblog/widgets/blog.tt
Created: articles/blog-meta.yml
Created: views/liteblog/widgets/blog-cards.tt
Created: ./activities.yml
Created: views/liteblog/single-page.tt
Created: articles/tech/first-article/content.md
Created: views/liteblog/index.tt
Created: public/css/liteblog/single-page.css
Created: views/liteblog/widgets/activities.tt
Created: public/css/liteblog.css
Created: public/css/liteblog/blog.css
Created: articles/tech/first-article/meta.yml
As you can see, Liteblog generates all sorts of assets in your Dancer app: CSS
files, views, a default layout, and even some starter content (like the
articles directory and the activities.yml file).
At this point, if you run the app, you'll be greeted with the default Dancer2 splash screen (which is normal, we did not change anything to the scaffolded code so far). Let's change that and morph this app into a sleek Liteblog site.
Edit your main app module (in this example, lib/myliteblog.pm) and
replace its content with the following snippet:
package myliteblog;
use Dancer2;
use Dancer2::Plugin::LiteBlog;
liteblog_init;
1;
That's it. Your app is now a Liteblog. Let's start it and check everything is fine.
$ plackup bin/app.psgi
[myliteblog:82943] core @2023-10-31 15:24:31> Built config from files: /private/tmp/myliteblog/config.yml /private/tmp/myliteblog/environments/development.yml in (eval 353) l. 910
[myliteblog:82943] info @2023-10-31 15:24:31> LiteBlog Init: forcing template_toolkit with '[%', '%]' in (eval 673) l. 81
[myliteblog:82943] info @2023-10-31 15:24:31> LiteBlog Init: registering route GET / in (eval 673) l. 81
[myliteblog:82943] info @2023-10-31 15:24:31> Liteblog init in /Users/alexis/perl5/perlbrew/perls/perl-5.36.1/lib/site_perl/5.36.1/Dancer2/Plugin.pm l. 565
HTTP::Server::PSGI: Accepting connections at http://0:5000/
When you visit this page in your browser, you'll be greeted with the standard Liteblog landing page
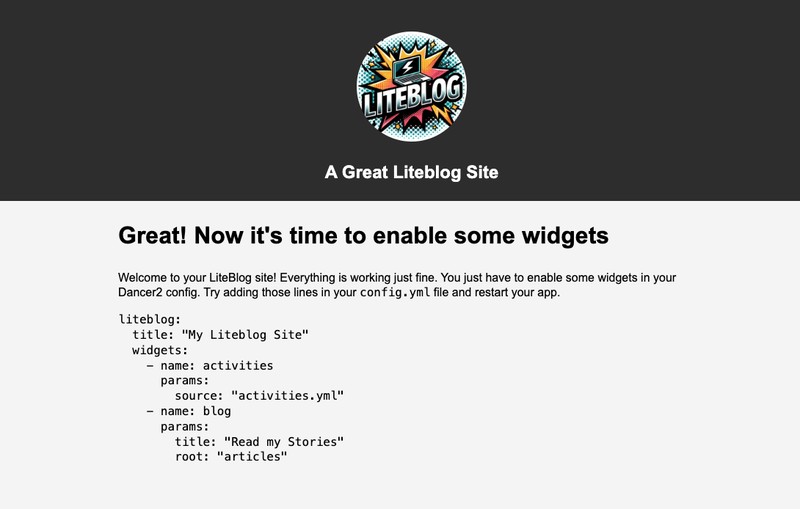
If you follow the instructions on the landing page, specifically copying the
config section into your local config.yml file and then restarting the app,
you'll see some preset 'Activities' cards and an article published in the 'tech'
category.
Creating articles is as straightforward as crafting a Markdown file in the right folder. The default article offered by the scaffolding lays out all the key guidelines.
More about Liteblog
If this small side project catches your eye, give it a star on CPAN. Even better: give it a spin, test it out, spot any bugs, and drop those issues on GitHub.